
Integrating FastSensor into your app or website can begin as soon as you create an account, requiring only three steps:
- Obtain your API credentials so FastSensor can authenticate your integration’s API requests
- Make a test API request to confirm everything is up and running
- Retrieve your data using FastSensor's API methods
Step 1: Obtain your API Credentials
FastSensor authenticates your API requests using your account’s API credentials. If you do not include your key when making an API request, or use one that is incorrect or outdated, FastSensor returns an error.
Your API credentials are available in the Dashboard. Click on Settings on the top bar, then select API.
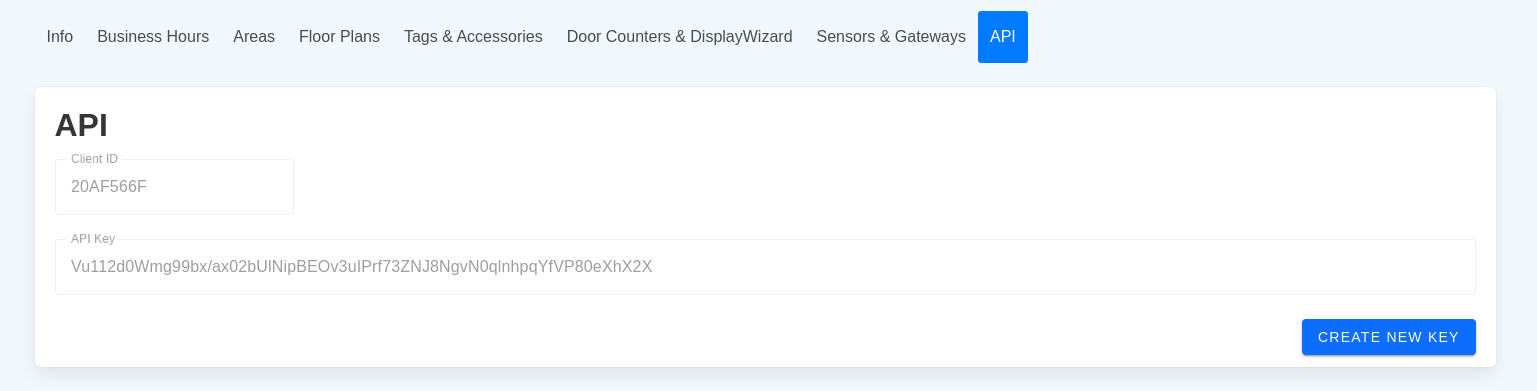
If you cannot see your secret API credentials in the Dashboard, this means you do not have access to them. Your user role must be at least Administrator to view the API credentials and Corporation Owner to create or change the credentials.
Step 2: Make a test API request
All API endpoints are only accessible via https and are located at api.fastsensor.us. Make a test API request to ping method to test your connectivity:
https://api.fastsensor.us/v1/ping?client_id=CLIENT-ID
The code examples include sample client_id and api_key. Replace with your own to see code examples populated with your own test API credentials.
CURL example:
curl -X GET "https://api.fastsensor.us/v1/ping?client_id=20AF566F"JavaScript example:
<script src="https://code.jquery.com/jquery-3.2.1.slim.min.js" integrity="sha384-KJ3o2DKtIkvYIK3UENzmM7KCkRr/rE9/Qpg6aAZGJwFDMVNA/GpGFF93hXpG5KkN" crossorigin="anonymous"></script>
<script>
    $.getJSON(
      "https://api.fastsensor.us/v1/ping",
      {
        client_id: "20AF566F"
      } )
      .done(function(data) {
        console.log("Success:");
        console.log(data);
      })
      .fail(function( jqxhr, textStatus, error ) {
        var err = textStatus + ", " + error;
        console.log( "Request Failed: " + err );
      });
</script>
RESPONSE:
- Status: 200 - OK
{
    "meta": {
        "code": 200
    },
    "data": "pong"
}
Step 3: Retrieve your data
To check that your integration is working correctly, make a test API request using your API credentials.
The code examples include sample client_id and api_key to access the ADAM demo. You can use the demo credentials for your tests. Then, replace the demo credentials with yours to access your data.
Generate your temporary Bearer Token to query the API
Obtain your Bearer Token by accessing the following URL:
https://api.fastsensor.us/oauth2/token?client_id=CLIENT-KEY&api_key=API-KEY
CURL example:
curl -X GET "https://api.fastsensor.us/oauth2/token?client_id=20AF566F&api_key=Vu112d0Wmg99bx/ax02bUlNipBEOv3uIPrf73ZNJ8NgvN0qlnhpqYfVP80eXhX2X"
JavaScript example:
<script src="https://code.jquery.com/jquery-3.2.1.slim.min.js" integrity="sha384-KJ3o2DKtIkvYIK3UENzmM7KCkRr/rE9/Qpg6aAZGJwFDMVNA/GpGFF93hXpG5KkN" crossorigin="anonymous"></script>
<script>
    $.getJSON(
      "https://api.fastsensor.us/oauth2/token",
      {
        client_id: "20AF566F",
        api_key:
"Vu112d0Wmg99bx/ax02bUlNipBEOv3uIPrf73ZNJ8NgvN0qlnhpqYfVP80eXhX2X"
      } )
      .done(function(data) {
        console.log("Success:");
        console.log(data);
      })
      .fail(function( jqxhr, textStatus, error ) {
        var err = textStatus + ", " + error;
        console.log( "Request Failed: " + err );
      });
</script>
RESPONSE:
- Status: 200 - OK
{
    "token_type": "bearer",
    "access_token": "eyJ0eXAiOiJKV1QiLCJhbGciOxMiJ9.eyJpYXQiOjE1ODkzMDExODEsSI6IkNRRW9SMTU4VHZMbnlLR0laQ05oYmh6NFR6QnpRYVgrTWpCQlJqVTJOa1k9IiwiaXNzIjoiYXBpLmZhc3RzZW5zb3IuY29tIiwibmJmIjoxNTg5MzAxMTgxLCJleHAiOjE1ODkzMDg5ODEsImRhdGEiOnsiY2xpZW50SWQiOiIyMEFGNTY2RiJ9fQ"
}
The Bearer Token will expire within two hours
You should obtain your Bearer Token to use example code provided below.
For simplicity, we will use a variable to store the token and use it from this point on. You shall replace the variable content with the token you obtained.
CURL example:
TOKEN="eyJ0eXAiOiJKV1QiLCJhbGciOxMiJ9.eyJpYXQiOjE1ODkzMDExODEsSI6IkNRRW9SMTU4VHZMbnlLR0laQ05oYmh6NFR6QnpRYVgrTWpCQlJqVTJOa1k9IiwiaXNzIjoiYXBpLmZhc3RzZW5zb3IuY29tIiwibmJmIjoxNTg5MzAxMTgxLCJleHAiOjE1ODkzMDg5ODEsImRhdGEiOnsiY2xpZW50SWQiOiIyMEFGNTY2RiJ9fQ"
JavaScript example:
var tokenID = "eyJ0eXAiOiJKV1QiLCJhbGciOxMiJ9.eyJpYXQiOjE1ODkzMDExODEsSI6IkNRRW9SMTU4VHZMbnlLR0laQ05oYmh6NFR6QnpRYVgrTWpCQlJqVTJOa1k9IiwiaXNzIjoiYXBpLmZhc3RzZW5zb3IuY29tIiwibmJmIjoxNTg5MzAxMTgxLCJleHAiOjE1ODkzMDg5ODEsImRhdGEiOnsiY2xpZW50SWQiOiIyMEFGNTY2RiJ9fQ";Query the available Locations
Use /locations resource to query the API for all available Locations:
https://api.fastsensor.us/v1/locations
CURL example:
curl -X GET "https://api.fastsensor.us/v1/locations" -H "Authorization: Bearer ${TOKEN}"
JavaScript example:
<script src="https://code.jquery.com/jquery-3.2.1.slim.min.js" integrity="sha384-KJ3o2DKtIkvYIK3UENzmM7KCkRr/rE9/Qpg6aAZGJwFDMVNA/GpGFF93hXpG5KkN" crossorigin="anonymous"></script>
<script>
$.ajaxSetup({
beforeSend: function(xhr) {
xhr.setRequestHeader('Authorization', 'Bearer ' + tokenID);
}
});
$.getJSON(
"https://api.fastsensor.us/v1/locations",
)
.done(function(data) {
console.log("Success:");
console.log(data);
})
.fail(function( jqxhr, textStatus, error ) {
var err = textStatus + ", " + error;
console.log( "Request Failed: " + err );
});
</script>RESPONSE:
- Status: 200 - OK
{
    "meta": {
        "code": 200
    },
    "description": {
        "object":"locations",
        "api_version":"2020-02-01",
        "created":1589326538,
        "has_more":false
    },
    "data": [
        {
            "id":"204D5F25",
            "corporation":"FastSensor Demo",
            "name":"ADAM DEMO",
            "featured":true
        },
        {
            "id":"F5224D04",
            "corporation":"FastSensor Demo",
            "name":"PLUS DEMO",
            "featured":true
        }
    ]
}
We will use another variable to store the location ID and use it from this point on. During your tests, you shall receive the same locations ID when using the sample API credentials provided here:
- For PLUS, use "F5224D04"
CURL example:
LOCATIONID="F5224D04"
JavaScript example:
var locationID = "F5224D04";PLUS - Query foot traffic
Use /locations/location-id/foot-traffic resource to query the API for recent foot traffic:
https://api.fastsensor.us/v1/locations/location-id/foot-traffic
CURL example:
curl -X GET "https://api.fastsensor.us/v1/locations/${LOCATIONID}/foot-traffic" -H "Authorization: Bearer ${TOKEN}"
JavaScript example:
<script src="https://code.jquery.com/jquery-3.2.1.slim.min.js" integrity="sha384-KJ3o2DKtIkvYIK3UENzmM7KCkRr/rE9/Qpg6aAZGJwFDMVNA/GpGFF93hXpG5KkN" crossorigin="anonymous"></script>
<script>
    $.ajaxSetup({
          beforeSend: function(xhr) {
              xhr.setRequestHeader('Authorization', 'Bearer ' + tokenID);
          }
     });
    $.getJSON(
      "https://api.fastsensor.us/v1/locations/" + locationID + "/foot-traffic",
      )
      .done(function(data) {
        console.log("Success:");
        console.log(data);
      })
      .fail(function( jqxhr, textStatus, error ) {
        var err = textStatus + ", " + error;
        console.log( "Request Failed: " + err );
      });
</script>
RESPONSE:
- Status: 200 - OK
{
    "meta": {
        "code": 200
    },
    "description": {
        "object":"foot-traffic",
        "api_version":"2020-02-01",
        "created":1617963173,
        "has_more":false,
        "start_date":"2021-04-08",
        "end_date":"2021-04-08"
    },
    "data": [
      {
            "date":"2021-04-08",
            "walk_by":9981,
            "visitors":28,
            "engagers":14,
            "browsers":14,
            "avg_visit_duration":7.6
      }
    ]
}
Date range
When you query the alert resource without defining a date range, the API will use the previous day. Note that the description includes start_date and end_date.
Once you have successfully made the API requests, you’re ready to begin integrating FastSensor.
Next steps: